
In this tutorial, I will show you how to renew / install SSL certificate, with DireactAdmin, cPanel or Certbot(non-management panel).
SSL – Secured Sockets Layer, is a protocol that secures and encrypts the communication of two machines.
Why should I use SSL?
As described above, the SSL encrypts the communication between two end points.
But remember that SSL cannot block the regular http port (80) traffic, or defend you against hackers, the SSL only encrypts the data.
Renew certificate:
We have two different SSL certificate types, free certificate, and paid certificate.
The only different is that the expiration date of the paid certificate, is longer than the free one.
The free certificate is valid for 3 months, while the paid certificate is valid for a year and above.
We can renew the free SSL certificate with DireactAdmin or cPanel.
Installation:
DirectAdmin:
Let’sencrypt is a program that issues a free SSL certificate that supported by a lot of browsers.
Log to your DirectAdmin VPS:
ssh root@IP_Adress -p Port_number
Now we have to make sure that all packages are up to date:
Yum OR apt -y update
Also we will clean the software list and make sure we’ve got the latest letsencrypt:
cd /usr/local/directadmin/custombuild/
./build clean all
./build update
./build letsencrypt
And rewrite the configuration files:
./build rewrite_confs
Now we have to enable Letsencrypt extension in our DireactAdmin, we have to connect via SSH to our server, and then open the configuration file in this path:
vim/usr/local/directadmin/conf/directadmin.conf
Find the line letsencrypt=0 and change from 0 to 1and now the lets encrypt is enable
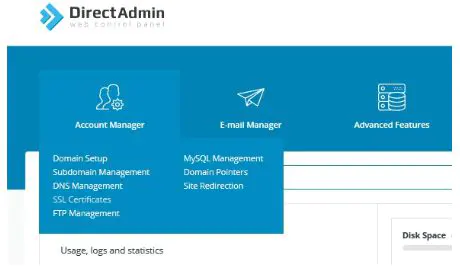
After that, we’ll login to our DA panel, and go to Domain Setup and choose the right domain that we want to activate the SSL for.
1. We look for the domain or user that we want to change.
2. Below Account Manager we go to SSL Certificates
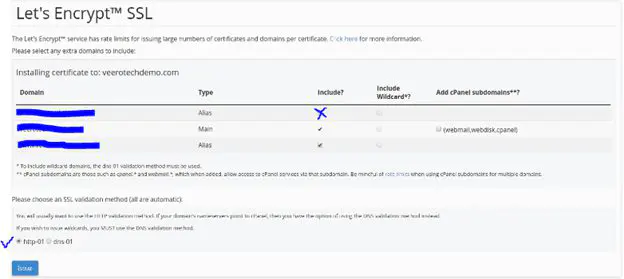
1. After that we can see that we got free options of SSL certificates, we’ll check the relevant checkboxes according to the domains that we want to secure:

2. We’ll click on SAVE and this massage should appear:

Now we received the SSL certificate from Letsencrypt and after a few minutes the certificate is ready.
cPanel:
1. sing in to your user in cPanel
2. choose Lets encrypt SSL
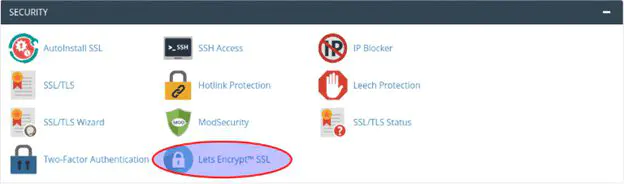
3. choose the domain and click on issue and after that it will take us to other options

4. click on issue to install the certificate
And then we get a massage that certificate was install succsfully.

What if I don’t have DirectAdmin or cPanel?
For that we got a tool named Certbot.
Certbot is an open source program that uses Letsencrypt in order to issue SSL certificate on your domains.
The Certbot must be installed directly on your server.
I will explain how to install it on Ubuntu 20.4
Part 1:
Install PIP
sudo apt install python3 python3-venv libaugeas0
Making the environment:
sudo python3 -m venv /opt/certbot/
sudo /opt/certbot/bin/pip install –upgrade pip
Install Ngnix or Apache:
Apache:
sudo /opt/certbot/bin/pip install certbot certbot-apache
Ngnix:
sudo /opt/certbot/bin/pip install certbot certbot-nginx
Creating symbolic link in order to make sure that we can use Certbot anywhere on the server:
sudo ln -s /opt/certbot/bin/certbot /usr/bin/certbot
After Certbot has been installed, we want to issue a certificate.
We got two options using Apache or Ngnix
Apache:
sudo certbot –apache
Nginx:
sudo certbot –nginx
After that, we’ll request a certificate to the specific domain:
sudo certbot –apache -d example.com -d <domain name>
Only SSL certificate
Apache:
sudo certbot certonly –apache
Ngnix
sudo certbot certonly –nginx
We type our mail for security authentication and agree to terms of use.
Make sure your email is valid.
Now we get an option we can connect with HTTP to HTTPS even we try to connect to HTTP he will redirect to HTTPS.
After the installing process, we want to check if our domain is secured by an SSL certificate.
We’ll go to www.sslshopper.com and we’ll test the domain’s SSL certificate.
All domain certificates are stored in the following path:
cd /etc/letsencrypt/live
Let’sencrypt issued a certificate for 90 days, to prevent the expiration of the certificate, Certbot checks the status of the certificate twice a day, and if the certificate will expire in 30 days and below, the certificate will be renewed.
We can see the configuration on system or cron.d:
systemctl show certbot.timer
cat /etc/cron.d/certbot
Debian 11
In order to install Certbot, we first need to install Snapd on our server.
We’ll update the repositories on our server first:
sudo apt update
After that, We’ll install snapd:
sudo apt install snapd
If we get the following prompt: “do you want to install Snapd”, we’ll type Y.
And then we install the Snapd core that he give us the diapedesis that connect to Snapd
sudo snap install core
We have to refresh the core, it will give us an indication that we have the latest version of Snapd:
sudo snap refresh core
Now we can install Certbot:
sudo snap install –classic certbot
The installation will be in path: /snap/bin/ and we’ll create a symbolic link to this path /usr/bin/,
In order to verify that we can run Certbot on every path in the OS:
sudo ln -s /snap/bin/certbot /usr/bin/certbot
Phase 2:
Cetrbot should find the virtual host on the apache configuration to configure the SSL certificate.
It’s searching for the SERVERNAME that matches the domain you’ve chosen.
To check the virtual host SERVERNAME, use vim:
sudo vim /etc/apache2/sites-available/>your_domain<.conf
We look for the SERVERNAME that belongs to the chosen domain:
…
ServerName >your_domain<;
…
Certbot will search for the right virtual host and update him
Now we need to update the firewall and the traffic that allow the HTTPS.
Phase 3:
Allow HTTPS in the firewall:
If you got UFW as your firewall, it has to be configured to allow HTTPS traffic.
When we install debian, the UFW installed by default with a profile that helps us to change the policy of the firewall from only HTTP, to HTTP/HTTPS.
We can check it with this command
sudo ufw status
Now we get this output
Output
Status: active
To Action From
— —— —-
OpenSSH ALLOW Anywhere
WWW ALLOW Anywhere
OpenSSH (v6) ALLOW Anywhere (v6)
WWW (v6) ALLOW Anywhere (v6)
To allow HTTPS traffic we have to allow “WWW FULL” and delete the “www” profile
sudo ufw allow ‘WWW Full’
sudo ufw delete allow ‘WWW’
Now we need to check the status
sudo ufw status
This is the output we get
Output
Status: active
To Action From
— —— —-
OpenSSH ALLOW Anywhere
WWW Full ALLOW Anywhere
OpenSSH (v6) ALLOW Anywhere (v6)
WWW Full (v6) ALLOW Anywhere (v6)
Phase 4:
Certbot gives us multiple plugin options to issue SSL certificate.
The apache plugin is reconfiguring the apache’s conf, and then reloads the configuration every time you want to use it:
sudo certbot –apache -d your_domain -d >www.your_domain<
When you execute certbot on first time you will get a message to put your email and agree to the terms.
Certbot will ask you if would you like to share your email with Electronic Frontier Foundation nonprofit organization that creates and supports Certbot, but you can refuse if you want to.
After that, Certbot will communicate with let’sencrypt servers, and will run a challenge to verify the control on the domain you want to issue SSL certificate for..
If everything goes well, the configuration will update automatically, and the apache will restart to load the new configuration.
Successful output:
Output
Successfully received certificate.
Certificate is saved at: /etc/letsencrypt/live/your_domain/fullchain.pem
Key is saved at: /etc/letsencrypt/live/your_domain/privkey.pem
This certificate expires on 2022-10-31.
These files will be updated when the certificate renews.
Certbot has set up a scheduled task to automatically renew this certificate in the background.
Deploying certificate
Successfully deployed certificate for your_domain to /etc/apache2/sites-available/your_domain-le-ssl.conf
Successfully deployed certificate for www.your_domain to /etc/apache2/sites-available/your_domain-le-ssl.conf
Congratulations! You have successfully enabled HTTPS on https://your_domain and https://www.your_domain
– – – – – – – – – – – – – – – – – – – – – – – – – – – – – – – – – – – – – – – –
If you like Certbot, please consider supporting our work by:
* Donating to ISRG / Let’s Encrypt: https://letsencrypt.org/donate
Now the certificate was downloaded, installed and ready to use.
Now refresh the website on https:// and check if you got the lock that indicate that your website is secured.
Certbot will automatically renew the certificate, 30 days before the certificate is expired.
Install centOS7:
We have to add the RPEL with this command:
sudo yum install epel-release
Now after we got access to the repository, we need to install the following packages:
sudo yum install certbot python2-certbot-apache mod_ssl
During the installation, we’ll be asked to import the GPD key.
the function of the key is to secure the packages you are installing. to enable the installation, press Y and Enter.
After the installation you can run Certbot, and issue the SSL certificate to your domains.
In order to issue a certificate to your domain, run the following command:
sudo certbot –apache -d >example.com<
Certbot will run with apache plugin.
If you want to issue a certificate to many domains or subdomains, we can add more domains with the
-d option:
sudo certbot –apache -d example.com -d www.example.com
Certbot will show us information about the apache configuration.
Run the following command:
sudo certbot –apache
And we’ll get this output:
Output
Please choose whether or not to redirect HTTP traffic to HTTPS, removing HTTP access.
– – – – – – – – – – – – – – – – – – – – – – – – – – – – – – – – – – – – – – – –
1: No redirect – Make no further changes to the webserver configuration.
2: Redirect – Make all requests redirect to secure HTTPS access. Choose this for
new sites, or if you’re confident your site works on HTTPS. You can undo this
change by editing your web server’s configuration.
– – – – – – – – – – – – – – – – – – – – – – – – – – – – – – – – – – – – – – – –
Select the appropriate number [1-2] then [enter] (press ‘c’ to cancel):2
After the installation is complete we will receive this message.
Output
IMPORTANT NOTES:
– Congratulations! Your certificate and chain have been saved at:
/etc/letsencrypt/live/example.com/fullchain.pem
Your key file has been saved at:
/etc/letsencrypt/live/example.com/privkey.pem
Your cert will expire on 2019-08-14. To obtain a new or tweaked
version of this certificate in the future, simply run certbot again
with the “certonly” option. To non-interactively renew *all* of
your certificates, run “certbot renew”
– If you like Certbot, please consider supporting our work by:
Donating to ISRG / Let’s Encrypt: https://letsencrypt.org/donate
Donating to EFF: https://eff.org/donate-le
The certificate files will be stored in the following path: /etc/letsencrypt/live.
Now the certificate is downloaded and installed, to check if the SSL certificate is working, go to https://www.sslshopper.com/ssl-checker.html.
We will get information about the domain. The certificate is valid for 90 days.
Certbot has a command that checks if a certificate should be renewed (If the expiration date is 30 days or below).
The command runs twice a day.
sudo certbot renew –dry-run
Output
Saving debug log to /var/log/letsencrypt/letsencrypt.log
– – – – – – – – – – – – – – – – – – – – – – – – – – – – – – – – – – – – – – – –
Processing /etc/letsencrypt/renewal/example.com.conf
– – – – – – – – – – – – – – – – – – – – – – – – – – – – – – – – – – – – – – – –
Cert not due for renewal, but simulating renewal for dry run
Plugins selected: Authenticator apache, Installer apache
Starting new HTTPS connection (1): acme-staging-v02.api.letsencrypt.org
Renewing an existing certificate
Performing the following challenges:
http-01 challenge for example.com
http-01 challenge for www.example.com
Waiting for verification…
Cleaning up challenges
Resetting dropped connection: acme-staging-v02.api.letsencrypt.org
– – – – – – – – – – – – – – – – – – – – – – – – – – – – – – – – – – – – – – – –
new certificate deployed with reload of apache server; fullchain is
/etc/letsencrypt/live/example.com/fullchain.pem
– – – – – – – – – – – – – – – – – – – – – – – – – – – – – – – – – – – – – – – –
– – – – – – – – – – – – – – – – – – – – – – – – – – – – – – – – – – – – – – – –
** DRY RUN: simulating ‘certbot renew’ close to cert expiry
** (The test certificates below have not been saved.)
Congratulations, all renewals succeeded. The following certs have been renewed:
/etc/letsencrypt/live/example.com/fullchain.pem (success)
…
Here is another way to run Certbot with cronjob.
Since the renewal takes place in 30 days, we can write a cronjob that checks once a week or a day if the certificate is about to be expired in the next 30 days.
To create cronjob, we need to login to our server and run:
sudo crontab -e
Your default text editor will open the crontab file:
0 0,12 * * * python -c ‘import random; import time; time.sleep(random.random() * 3600)’ && certbot renew
This command will randomly select a minute within an hour (00 and 12) to renew the certificates.
Now just save the file.